Paths on a personal or garden plot, paved with paving slabs, are functional and aesthetic. Paving stone pavement is strong, durable, easy to maintain and attractive. But the cost of such a coating, when it comes to buying several tens of square meters of tiles, is significant. Therefore, craftsmen, in order to save money, using technologies available for home conditions, have been successfully making paving slabs with their own hands for several years.
The quality of paving slabs depends on compliance with the technology and the correct formulation.
Technology Choice
There are two ways to produce paving slabs:
- vibrocompression;
- vibrocasting.
The first method for the production of tiles at home is not suitable by definition - there is nothing to press with. And the manufacture of high-quality paving stones with your own hands by vibrocasting is quite real.
Manufacturers offer the following types of molds for the production of paving stones:
- polyurethane - allow up to 100 molding revolutions;
- from plastic - up to 250 revolutions;
- from plastic rubber - more than 500 cycles.
The price of products depends on the number of molding cycles, so the high cost of rubber and plastic molds implies their use in the production of large volumes of tiles, and polyurethane products are quite affordable for the average buyer. Having bought 5 molds, you can make 500 pieces of paving slabs with your own hands, and with careful handling it is possible to make more.
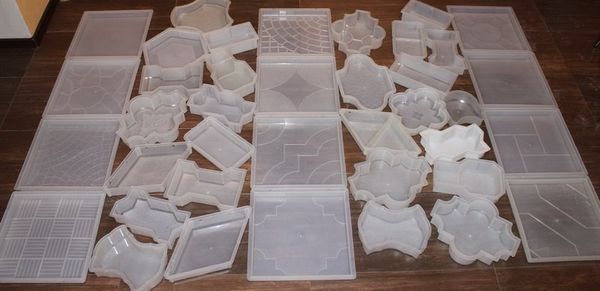
Tile molds
Forming templates for the production of paving stones
For casting paving slabs “in place”, template molds are used in the form of a frame made of partitions, resembling irregularly shaped honeycombs, which you can buy or make yourself. Having laid such a frame on a properly prepared base, the honeycombs are filled with concrete. After a few hours, the template is removed, and instead of honeycombs, ready-made flat concrete fragments remain on the base, between which only the joints need to be arranged.
In addition, if it is planned to lay paving stones, for example, on auxiliary paths of a garden plot, and the requirements for it are low, then molds for casting such tiles can be made by hand.

For the manufacture of paving stones, first of all, you need to stock up on special molds for casting.
Independent production of molds for casting
The universal format of paving slabs is a square with a side of 30 cm. This size provides the necessary strength when working on bending and is convenient for cutting the product in half or into 4 parts when you need to adjust the material. Therefore, from wooden smoothly planed bars with a section of 60 x 30 mm, you need to make a frame with internal dimensions of 30 x 30 cm and a depth of 60 mm with your own hands. It is better to assemble the frame on self-tapping screws, which in the future, when removing the frozen product, it will be easy to unscrew and then return to its place.
To form a pattern on the front side of the future paving slab, an elastic base with a corrugated surface is chosen, for example, a rubber mat with a large pattern, and a form frame is laid on it.
Before forming the side of the frame and the figured base with a brush, smear with a thin layer of kitchen gel for washing dishes.
So that the process of making tiles with your own hands does not drag on for months or years, you need to make at least 10 forms.
Making paving slabs with your own hands is a rather laborious process.
As forms for paving slabs of small format, disposable plastic containers can be used for packaging various products, filling them with mortar to a fixed depth. The turnover of such "forms" is 5-10 cycles, but this is offset by the negligible cost of used boxes.
Manufacturing technology of paving slabs by vibrocasting
This method consists in pouring cement-based mortar into special shapes with simultaneous or subsequent compaction of the contents by vibration.
Vibrocasting can be produced using single-layer and two-layer technology.
single layer method
The single-layer technology consists in filling the molds with a solution, compacting on a vibrating table, followed by holding the products in the molds for two days and demoulding. The strength and aesthetics of such a tile is lower than that of a two-layer paving stone made by vibrocasting, therefore it is used for paving utility areas that do not require high aesthetics.

Making vibropressed paving slabs is easier than making vibrocast
Double-layer vibrocasting
With two-layer pouring, a solution with a coloring pigment layer of 1-2 cm is poured into the molds while vibrating. On top of the colored solution, without waiting for the setting of the front layer, flush with the edges of the forms, the composition of the main layer without dye is poured and vibrated for 15-30 seconds. After 2 days, the products are removed from the molds and stored for drying in a cool place.
Regardless of the number of layers, the forms filled with mortar are covered with a plastic film to prevent premature evaporation of moisture and partial loss of paving stone strength.
The purpose of the front layer is to increase the strength characteristics and aesthetics of paving slabs. This layer is a durable shell with a glossy surface, dyed in the selected color by adding a dye to the solution. If, instead of gray cement M500, white cement of the same brand is used, then the colored front layer can be made saturated, without a gray tint.

Do-it-yourself preparation of paving mortar is an economical option
Facing concrete components
To make the front layer durable, uniform and glossy, the following materials should be included in the composition of the solution:
- cement M500 (preferably white);
- crushed stone (granite, marble, gravel) fraction 5-10 mm;
- sifted sand in the ratio;
- water;
- color;
- dispersant.
Recipe of concrete for the formation of the front layer
When performing kneading on the front layer, the weight ratio of the amount of cement and SCHPS is 1:2.
Using the example of a specific operation, we will consider the procedure for mixing the solution of the front layer in a concrete mixer. 10 liters of water are poured into the mixer, into which, in the case of the production of colored paving stones, a dye is preliminarily added. Then 750 grams of an aqueous solution of a dispersant are poured into it, a concrete mixer is turned on and 3 buckets of SCHPS and Portland cement M500 are sequentially poured. After a minute of mixing, 3 more buckets of screenings are added to the concrete mixer.

Mixing concrete in a concrete mixer is carried out in a certain sequence
Mixing is carried out for 15-20 minutes until the solution acquires a homogeneous consistency of thick sour cream, after which the mass is transferred from the concrete mixer to the tub, and molding can be done.
The amount of color in the solution should be no more than 5% of the batch volume. The proportion used must be remembered in case you need to make an additional batch.
Formation of the front layer of the tile in the form
After lubricating the inner surface of the molds, the prepared solution is laid out in them with a layer of 1-2 cm and compacted by vibration. In the absence of a vibrating table, you can get by with the installation of molded products on a sheet of iron and tapping from below with a rubber mallet. Particularly savvy craftsmen use a washing machine to vibrate, on which forms are placed when the centrifuge is operating in the spin mode.

The main difference between paving stones and paving slabs lies in its shape.
Components of the base layer solution
In the formulation of the solution forming the main layer, the dispersant is replaced by a plasticizer. In the process of preparing the mortar, one part of the M500 brand cement is mixed with three parts of the crushed stone-sand mixture. The plasticizer is added in the same amount as the dispersant to the face layer.
How to mix concrete for pouring the base layer
Consider the technology for the production of a specific portion of the solution using a concrete mixer.
750 grams of an aqueous solution of a plasticizer are mixed in 12 liters of water, after which 5 buckets of SCHPS and 3 buckets of Portland cement M500 are sequentially poured into a working mixer with liquid, after which another 3-4 buckets of screenings are added. There is no need to color the main material of paving slabs. The concrete is mixed for about a quarter of an hour and, upon reaching the consistency of sour cream, is unloaded into a tub.
To knead concrete at home per 1 sq. paving stones 6 cm thick, you will need:
- Crushed stone-sand mixture - 90 kg;
- Cement M500 - 25 kg;
- Dispersant - 120 grams;
- Plasticizer - 100 grams;
- Dye - 600-800 grams.
Reinforcing paving stones and pouring the base layer
To increase the strength of the tile, you can do the reinforcement of the product with your own hands. As a reinforcement, a cut-to-size “notch” (expanded steel sheet) made of a steel sheet with a thickness of 1 or 2 mm is ideally suited. The cut pieces are laid on top of the mortar of the face layer of the tile and covered with concrete flush with the edges of the forms. Reinforcement of products at home can also be done using pieces of thick wire or smooth rolled reinforcement, steel mesh laid crosswise.
To ensure the solidity of the tile, the filling of the second layer is carried out no later than 20 minutes after the formation of the first.
After the mortar is compacted by vibration, the molds are placed on a horizontal surface in a cool place for two days until the concrete hardens.

Modern paving slabs are suitable for arranging urban or country yards
Stripping molds and removing tiles
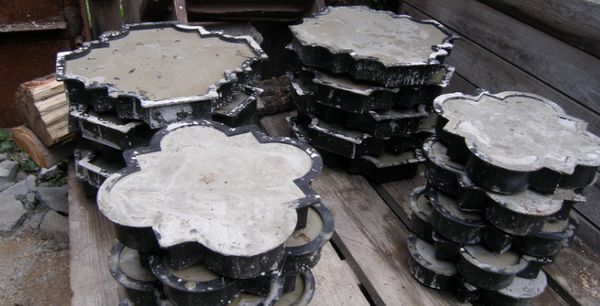
If the form is made by hand from wooden bars, then the fixing screws are unscrewed in one of the joints, after which the frame is moved apart, and the product is released. Paving stones are given another 10 days to gain strength and dry, laying the tiles in one layer in a cool room.
If polyurethane molds were used for the production of tiles, then the mold with the product is placed in a bath of warm (60 degrees) water for a couple of minutes to soften the polymer, after which the tile is removed and also placed in a cool place for 10 days until final readiness for use.
Taking into account that the tile must be in the form for two days, it is possible, having 10 forms at its disposal, to extract 5 finished products daily and make 5 regular moldings.
