What could be better than a wide open field, a warm light breeze and a kite dancing in the air?
We present you a training manual, which is useful for all novice pilots. There will be some science, physics, history and culture. For adults, this is a chance to plunge into youth again.
Flying a kite is fun, but only if you know how.
Environment
Kites love open space. The more open the place you have chosen to fly, the better the kite.
The wind, which has to bend around trees, buildings or hills, becomes uneven and rough. This is "turbulence".
You won't be able to see it, but it will be difficult for the kite to fly and perform tricks in such conditions.
Therefore, the first advice is to choose a place as far as possible from all sorts of obstacles that interfere with the smooth passage of the wind.
Everyone heard of "Tree-Eater-Kites"?
Make sure that there are no trees in the path of the kite, they do not interfere much with piloting, but a kite flying by can get into the air flow around the tree. As a result, he will get stuck between the branches and have to call the fire brigade to save the poor fellow...
And, of course, avoid proximity to dangerous objects, such as highways or power lines.
The best places to fly a kite are a large open field, park or beach. The more open space you find, the more fun and less trouble you will have.
Wind
A kite needs wind to fly. How strong depends on the type of kite you are about to fly. 
Some are heavy, respectively, require the presence of a strong wind. Others are specially designed to fly in light winds.
However, most kites are designed for use in the medium ranges of 1.5 - 5 m/s.
In most cases, you can determine the strength of the wind yourself, guided by your own feelings or observations of the behavior of the leaves on the trees. If the leaves barely move, then most likely it is too weak a wind, and if the whole tree sways and you can hear the linen flag fluttering, then it is even too strong.
Also, you can use special devices for measuring wind strength.
Experienced pilots eventually get used to judging the wind by eye on the effect on surrounding objects.
Kite
There are many varieties of kites. Each type was originally designed for specific purposes.
These can be simple diamond-shaped (diamond), triangular (delta), box-shaped (box), inflatable (parafoil) or controlled sports with two or four handrails.

Before launching, make sure your kite is suitable for the current wind strength, if the kite needs a tail, if the lifeline is firmly attached.
If everything is in order, you are ready to launch.
launch
 Running with a kite is fun but not too smart, you can't watch where you're running and enjoy the sight of the kite at the same time.
Such a flippant approach can lead to trouble for both you and the kite.
Instead, try a smarter approach.
Stand with your back to the wind and lift the kite as high as you can. Make sure the kite is "looking" straight up and release it easily. Do not overdo it, do not try to "throw" the kite into the sky, just let go and let it fly on its own.
If the wind is strong enough, the kite will rise into the sky and start flying. Slowly pull the rail and the kite will fly back towards you.
Then, just before it hits the ground, let go of the rail and the kite will rise up again. All you have to do is repeat this process until the kite is caught in a steady stream of wind.
 In light winds, you may need the help of a friend. Ask him to hold the kite at a distance of 15-20 meters from you and release it as soon as you pull the rail. The kite should rise into the sky in the same way as if you released it yourself in a stronger wind. Soon, the kite will rise into the zone of stronger wind and the difference will disappear altogether. This will make you look much "smarter" than people running around trying to help the snake fly.
flight control
Watch the kite continuously as it flies. If something goes wrong, you will have time to do something to avoid aggravating the situation until the structure breaks. Resist the temptation to let go of the rail too much: 30-60 meters is enough. At long distances it is quite difficult to observe the flight for you and the surrounding observers.
 If the line is loose, tighten it, if the line is too tight and the kite is unstable in the air, let it go a little. The main goal is to pilot the kite, not just let it fly.
To complete the process, start slowly winding the line onto the spool. If the wind suddenly weakens, you can do it faster. As a result, throw the lifeline along with the kite to the ground so that the lifeline lies freely in the open space, this will soon allow it to be lifted into the air again without additional difficulties.
In strong winds, it may be necessary to attach the lifeline to an anchor on the ground, as well as use gloves to avoid damaging your palms.
Remember that tension on the lifeline increases the force of the wind on the kite. If the kite is behaving unstable, do not pull the lifeline even more, trying to bring it closer to the ground. Instead, loosen the tension and let the kite rise freely higher into the sky before pulling back gently.
If the kite began to rotate in a large loop closer and closer to the ground, once again, when it is close to the ground, pull it towards you, this additional effort will land the snake on the ground. At this point, you will surely be glad that you did not let him go too far.
Leer
You can buy a leer in the same place as the kite itself. Quite often, kites are supplied with the lifeline, although this is not always the case.
Special lifelines are usually lighter, stronger and thinner. All these qualities have a positive impact on the piloting process. Ideally, it's best to use the thinnest lifeline that the particular type of kite can support.
Setting for different strength wind
 Many kites can be "fitted" to a specific wind force. Adjustment is carried out by changing the point of attachment of the rail to the kite. By moving the attachment point, you change the angle of the kite to the wind.
The larger the angle, the better the kite will be able to fly in strong winds, the smaller the angle will allow the kite to fly even in a light breeze. Too large an angle can cause the kite to flip in the wind and break, too small will not allow the kite to fly.
Experiment! You will be surprised how such a small change can make a big difference in flight quality.
Tail
 The design of many kites suggests the presence of a tail. The long tail, fluttering after the kite, serves as an undoubted decoration of the overall picture. But tails also have a practical value: the added weight to the underside tilts the kite up with its leading edge and provides better flight stability.
Thus, if your kite is unstable, try adding a tail, and vice versa, if the kite turns over and falls to the ground, you need to reduce the length of the tail or remove it altogether.
Tails are good for balance. One tail should be attached in the center of the kite next to the lifeline, two tails should be symmetrical on the sides, also make sure they are the same length/weight.
Problems
Even an experienced kiter sometimes encounters a tangled lifeline or finds his kite hanging from a tall tree.
Do not panic! Keep calm and everything will be fine
A snake in a tree? Don't try to climb, if you fall it will hurt . Yes, and do not pull the rail, it is unlikely to help, rather harm.
It is best to let go of the rail and wait until the wind blows the kite through the tree. After that, unhook the kite from the lifeline and pull out the lifeline. back.

If your kite's line gets tangled up with another kite's line, just walk up to the owner and say hello. Surprisingly, both tangled lifelines will descend to the ground right to the place where you both will be standing.
And what if the rails are intertwined on the ground? In principle, you can avoid this ambush by handling them carefully, but if it does happen, all you can do is carefully unravel the ball. Life is not perfect
The kite doesn't fly?
Not all flights go smoothly. If your kite won't fly, you may be experiencing one of the following problems:
- "Wrong" wind. Maybe too weak or too strong. The required wind strength depends on the kite, if there is a tail - try to unhook or attach a longer one.
- Turbulence. Trying to fly a kite near a building or big tree? Not sure it's going to happen.
- "Reconfigured". Maybe you or someone else has already adjusted this kite to a different wind and left it that way? Try to return as it was.
- "Circle". If the kite is circling, try adding a tail or moving the anchor point of the lifeline.
- "Lazy". If the kite does not want to rise into the air, unfasten the tail, move the attachment point of the lifeline. Maybe the rail got wet?
- Technical difficulties. Make sure the kite is assembled correctly, read the instructions again. Safety
Every pilot should be concerned about safety. A kite that has lost control can cause physical harm to a random person.
An unwound lifeline lying unattended on the field can be a danger to passers-by people or animals.
Please be careful when flying the kite around other people.
In particular, never launch a kite across the road, if the kite lands on the ground and the rail crosses the road, this may cause a road accident. Never fly near an airport or power lines.
Be polite and courteous to your neighbors, good pilots always treat other pilots with respect, and even strangers.
Remember that the sky is a shared resource, try to be sensitive to competitors for the attention of the audience.
So you will get much more joy and pleasure!
(c) David Gomberg. GKPI.
Translation - IM "GlavZmey"
Who didn't fly a kite as a child! For many of us, this was our favorite pastime to do. with my own hands was no problem. We made the simplest paper kites and rejoiced at how our creations flew into the wind. Now in stores you can find a variety of models of kites, from small children's kites to huge professional ones. And now we, having already become parents ourselves, go with interest to the sports department to buy this bright toy for our children. Let's remember together how to assemble a kite, and in what ways it can be raised into the sky.
Assembling a kite
Regardless of the level of complexity, all kites consist of a standard set of components. The most important thing in any kite is a strong frame that holds the shape of the structure during flight. It can be made from two or more rails. A fabric made of lightweight material is stretched over the frame, which creates an obstacle to the wind and allows the kite to soar in the air. It is important to know that when launching the kite, you need to position it in such a way that the canvas is in front of the frame, and the wind hits it. In some models of kites, a tail is attached to the canvas, made in the form of beautiful ribbons, which is designed to smooth out gusts of wind and stabilize the kite in the air.
The kite is controlled from the ground with a rope or thread, which is also called a lifeline. It must be very strong, but light enough not to impede flight.
The thread is wound on a special convenient spool. Often, kite makers make lifelines on carabiners so that people can unhook them. The junction of the thread with the kite is called the bridle. Depending on the number of attachment points, this can be:
- a bridle with one fastening that does not require adjustment in the air. The kite is corrected only by the tail.
- a bridle with a keel, made in the form of a single piece from a canvas of the same material. Also does not require adjustment during flight
- a bridle with two or more fasteners, which involves controlling a kite. To do this, it has a ring that allows you to adjust the angle of flight.
How to fly a kite
It is easy to fly a kite, the main thing is to choose a suitable place and catch the wind. To do this, we find a large open piece of land, preferably on a hill, where air currents move from bottom to top. If you are surrounded by trees and houses, it will be more difficult for the snake to rise due to uneven wind, and it will only be able to stabilize at a height of about 50 meters.
Important to remember:
- In no case should you fly a kite under power lines, near highways and airports, as well as during a storm with thunder and lightning. Even if the place seems perfectly flat and spacious to you, and the wind in a thunderstorm is just perfect for kite flying, such games can be life-threatening.
- Never fly heavy kites over people or animals. If you lose control, this whole structure with a rigid frame at high speed can fly at a person and cripple him. If you want to play with the kids on the beach by the sea, this is a lightweight paper kite that won't hurt anyone.
- When flying a kite in sunny weather, use sunglasses. If you get carried away with the game and stare at the sky, you may not notice how the bright sun will harm your eyes.
- Be sure to protect your hands. Use gloves and reel. In no case do not wind the handrail around your hands. A strong gust of wind can lift the kite up, and the rapidly unwinding thread will burn your skin.
Before sending your kite into the sky, we place it facing us, stand with our backs to the wind and pull the threads. Flying a kite is largely dependent on wind speed. If the wind is strong enough, the kite can be launched directly from the hands, placing it with its nose into the wind and slowly unwinding the rope. If the wind is not very strong, you may need help. Unwind the coil 15-20 meters, pull the thread and ask someone to throw the kite up. It happens that the wind is weak near the ground, but strong enough above. This is evidenced by the swaying tops of the trees. In this case, the kite will fly only at a certain height. But in order to raise it to this height, you will have to run a little against the wind.
Watch the thread tension carefully. If the wind stops and the tension begins to loosen, wind the thread around the spool or simply pull it towards you. If the wind increases, the rope needs to be unwound a little, or, for example, you can take a few steps in the direction of the wind. When the kite begins to fall, and the situation can no longer be corrected, let go of the rope so that the impact on the ground is softer.
controlled kite
When you have the opportunity to fly a kite, it's always exciting. But to launch such kites, you need a strong wind, because in a light wind, holding two coils in your hands, you will not be able to run backwards. During launch, it is desirable to have an assistant. But you can also cope on your own, although, most likely, not on the first try.
When the kite takes off, keep your hands at chest or hip level. Try to pull the right thread towards you. You will see the kite fly to the right. If you pull left hand, you can straighten it or tilt it to the left, respectively. Movements should be smooth. If you pull the threads, the kite will quickly fall. Do not unwind the thread too much. Get used to the kite's maneuvers first. And after a little training, release it higher. Do not worry if the threads twist several times, this will not affect the control in any way.
In skillful hands, the kite can draw various shapes in the air, as well as perform tricks such as the "eight", "dead loop" and "spiral descent". If you are still unable to control the kite, do not worry, very soon you will master all the subtleties of flight, and your kite will soar in the air for hours to the delight of you and your children.
In order not to catch a cold, now we use outerwear made of membrane fabric. Usually it is a jacket and pants, sometimes overalls. On a naked body (not on a T-shirt!) We put on a set of thermal underwear, it retains heat due to the repulsion of moisture from the body. After all, with an active pastime in an ordinary autumn jacket, a woolen sweater, children sweat, hence the trouble - their wet body is blown by a cold wind and the child gets sick.
The harder you wrap the kids, the worse it gets. It turns out a vicious circle and parents choose the option of staying at home rather than walking. Membrane fabric protects from the wind, it is not blown, but breathes. If the air temperature outside is not very comfortable, you can put on a fleece jacket on top of the thermal underwear or just take it with you until you get a feel for how the rule “thermal underwear set + membrane outerwear” works.
It is necessary to ensure that the child's body is dry. This can be done by running a hand through the neck to the back and feeling it for moisture. High-quality thermal underwear copes with providing dryness perfectly. We bought it in "Sportmaster" and "Champion", as we are afraid of fakes and do not save on quality. If you take into account the above recommendations, then the child will remain dry, which means it will not freeze.
Walking in any weather helps to strengthen our immunity. And in order not to be distracted by an unpleasant wind, you need not only to dress properly, but also to do a pleasant thing. Then you won't even remember the discomfort.
Kites and kites for children
Without rain, mushrooms will not grow, and without wind, a kite will not fly. Windy autumn days are a good time to start. This activity also contributes to the increased physical activity of the child. You need to run so that the speed of the kite is sufficient and it does not fall to the ground.
Everything is so simple that there are no questions about how to assemble and fly a kite. Even a child can handle it. There is another benefit - children acquire new skills. For example, when we taught them how to tie a kite and explained the construction, they learned how to tie knots in a new way.
The children loved this activity so much that we went further - we bought them an aerobatic kite. In their eyes, it looks like a parachute, only smaller. The main thing is that it will not tear the child off the ground, which means it is safe. The children mastered the control of the kite during the first ride and now they are only improving the result.
There are pull kites. You cling to them with the help of a special design - a trapezoid. A kite accompanies us in winter on ski trips through the fields, and in summer - along the sea waves on a board. Our dad is just into these sports. And the children are also slowly working out the skills of piloting such an unusual kite.
The youngest son, Dim Dimych, four years old, has already switched to piloting a pull kite. For safety, we gave him the smallest representative of this line - a snake of 3.5 square meters. The wind speed range should be 3-5 meters per second.
First of all, we check the speed of the kite without the participation of the child. If control is given without much effort and there are no powerful uncontrollable impulses, we give the snake to our son.

We use the Beaufort scale to determine wind speed.

How to choose a kite
Most kites have lines up to 25 meters long. For older children, they are 11 and 12 years old, this is already within their power - they manage to manage. Freely measure the distance to shrubs or trees and the length of the lines.
But such a length prevents Dim Dimych from grasping the meaning of which handle to pull the kite now so that it flies in the right direction. Therefore, especially for him, we unfasten such long lines and install shortened ones 3-4 meters long. For this purpose, a regular rope with a diameter of 2-3 mm is suitable. With shortened lines, the kite loses its excess traction, quickly and easily reacts to the movements of the child's hands.

A flying kite brings a lot of joy when a gust of wind pulls the child in one direction, then in the other, and the baby runs after a beautiful “parachute”. And if he himself lifts, steers, drops, sometimes especially on dad or mom, this “big miracle” is indescribable happiness in his eyes.
At such moments, we all forget that autumn and the beginning of winter are a dull time of the year. Nature does not have bad weather, there are unadapted clothes and not knowing what to do.
Hope our idea how to spend windy autumn days someone will like it. And such terminology as “often ill child” will be less likely to remind of itself. Personally, we now try not to miss opportunities and get out any day. The main thing is that there should be a stadium, a park or a field nearby - any territory above which there is an airspace free from wires and tree branches.
On the video - how we launch the kite.
Photo, video and text - Yulena Terekhova
The first references to homemade flying kites are found in Chinese chronicles of the 2nd century BC. We invite you to repeat the feat of the ancient Chinese: refuse to buy a kite in a store and make it yourself. And then mark it in your annals.
HANDMADE - KITE MASTER
1. To make a simple flat kite, you will need two thin slats of pine, bamboo, or Chinese plastic. One is 50 cm, the other is 30. At a distance of 15 cm from the edge of the larger rail, with harsh threads (or harsh tape), fasten the 30-centimeter crosswise at a right angle. This will be the cross of the snake.
2. At the ends of the rails we make circular notches. Now boldly connect all the ends of the cross with a thin thread. This will give you a feeling of contentment and a quadrangular skeleton of a kite.
3. The cover is made of thin paper, such as tracing paper. It's great to use a cut plastic trash bag. The lighter the material, the easier it will be to send the kite to the sky. Lay the frame on a sheet of the selected material, circle with a pencil, leaving small allowances, and cut out the figure along the contour. Now grease the frame with glue and stick it to the material.
4. If there is no store advertising on your package, it does not matter. The drawing is the face of a snake. With a marker, draw on it your favorite politician, the legs of a woman you know, smiling Freddy Krueger, or just a call to take care of environment. Remember, what will be on the kite will be able to study all the neighbors in the area, and it’s good if their cultural level rises from this.
5. Now we make a bridle. One end of the fishing line is attached to point O, stretched to point N and then to point P, fasten at P. (We pulled to point N to determine the length of the bridle). Another thread is fixed at point N. We measure the distance from N to P, add another 10 cm and tie this length to the center of the first thread. It is important that both halves of the long segment are the same, otherwise the kite will fall sideways.
6. The tail of a kite is added to point G. It is customary to make it from a thin cord 3-4 m long; and several paper bows are usually glued to the tail at an equal distance from each other. The tail is needed to improve the aerodynamic qualities of the device.
7. For a handrail (this is the name of the thread on which the glider holds the snake), a fishing reel with fishing line is suitable. Attach the end of the fishing line to the bridle, and the kite is ready!
NEGLECTED CASE - SEND TO THE SKY
The idea to launch a ready-made kite is in the air.
1. When choosing a place to fly a kite, you should pay attention to open areas. Any nearby wind barriers, trees, stalls, statues of leaders, etc. the wind will be turned away from the true path and will give it unnecessary turbulence. Ideal for sea coast kites. But if you have to catch the breeze by jumping over the bodies laid out on the beach, you can look at other spaces. The selected glade should not be located next to a busy highway (glider pilots often run with their faces up to the sky and pose a danger near roads) and away from power lines and airfields.
2. Having slobbered your finger, find out the direction of the wind. Give the kite to your friend, whom you prudently took with you, and stand opposite him, but so that the wind blows at your back. Let the reel with the handrail be in your hands. Take a few steps back, unwinding the line. Please note that a friend should not type SMS at this time: the snake must be held with both hands above his head, trying to position it perpendicular to the direction of the wind.
3. Having moved 15-20 m away, shout to a friend: “Let go!” - and pull the handrail toward you with a jerk. If the wind is decent, the kite will rise up on its own, and you will be left standing with the coil, joyfully watching its flight. Otherwise, you will have to run a few more meters until the kite catches the wind.

4. If the kite only flies when you are running, then the wind is weak today. Even if it’s a shame to admit it after the marathon distance that you just completed with a lifeline in your hand. In a normally blowing monsoon, the flying structure flutters in height as long as it is simply held at arm's length. The wind speed of 3-6 m/s is considered optimal for a beginner. At a lower speed, only the lightest structures will be able to rise, at a much higher speed, the kite will be torn from the hands and will be subject only to a specialist kiter.
5. If the rail pulls strongly, you need to unwind the coil a little. Flight with a subsiding wind is regulated by pulling the kite towards you. With a successful combination of circumstances, the kite will hang in the air for several hours, and you will have time to take a break from the hustle and bustle.
6. In order to finally go home, the snake is pulled to the ground, gradually winding the rail. Announce to the children and onlookers gathered around that today you will not start anything else, except for the engine of your car. It might help them to break up.
Kite. Types of kite. How to fly a kite?
How to fly a kite correctly.
In our time, a kite has long ceased to be just an exciting game for all ages, now it is a whole direction in sports, many competitions and festivals around the world.
What types of kites are there?
There are several main types of kites, which differ in their characteristics, difficulty in flying, and simply in appearance.
According to their type, kites are divided into two main ones: steerable and unguided kites. Controlled kites - control is achieved by two or more lines. Unsteered kites - most kites are single line kites where the main movement of the kite is due to wind currents only.
By their appearance, snakes are divided into a variety and shape of the frame.
Flat kite. This kite is a flat frame, uniform flight is due to the shape, tail and airflow. Most kites (the most familiar to us) are flat.
Box kite. Three-dimensional kites, with great stability and more lifting force.
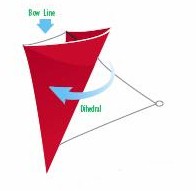
Curved kite. There is a transverse bend in the frame, this makes the snake more stable, such a bend makes it unnecessary for the kite to have a tail.
Non-rigid snake. In such a kite, there are only single frame elements, and the main form is achieved by wind currents.
Frameless kite. The complete absence of a frame. The form is taken by air currents.
Kites with two lines or more (two lines, four lines). A distinctive feature is the possibility of full control and management, performing various tricks.
In our store you can choose and buy cheap kite.
How to fly a kite correctly?
It is very important to remember that you should not fly a kite near airports and power lines, as well as during thunderstorms. Always keep your safety in mind.
The main assistant in flying a kite is the wind. It is better if the weather is windy, but there is no strong or gusty wind.
An open area will be optimal for launching, so that the wind does not have barriers in the form of houses or trees.
It is easiest and easiest to fly a kite with two people. One person holds the kite upside down, facing the wind, the second stands with his back to the wind and unwinds the rope 15-20 meters and pulls it. With a gust of wind, the kite must be tossed up.
If the kite began to descend, then it is necessary to tighten the thread, and if it is too high, then, on the contrary, loosen it.
Flying a kite is a fun activity for all ages.
